概述 作为教研室的网管,干了很多运维的工作,而一个高效的运维是必须少做重复性工作。教研室的网管做的最多的事就是在很多服务器上给很多同学分配很多虚拟机,由于同学们没法直接操作服务器,所以有时系统也是需要网管帮忙安装的,而安装系统的过程费时费力且没啥技术含量。所以最好的办法给各种系统保存一份模板镜像,如果同学需要一个虚拟机就给他复制一份,然后从镜像启动虚拟机,无需重复系统安装的过程,一人一个文件夹,方便管理。本文就将介绍如何在 KVM 环境下从磁盘镜像创建虚拟机。
实现过程 这里假设保存的磁盘镜像格式为 qcow2 格式的,操作系统为 Linux ,并且后面的操作的磁盘名称为:ubuntu.qcow2。
命令行实现: 在命令行下,使用 virt-install 命令来安装虚拟机,这命令有很多选项,这里不详细介绍,可以通过 man virt-install 仔细查看。我们通常安装虚拟机都是通过系统 ISO 文件来安装系统,使用的命令如下:
1
2
3
4
5
6
virt-install --virt-type kvm --name ubuntu --ram 4096 --vcpus=4 \ --cdrom=/home/kb310/test/ubuntu-16.04.4-desktop-amd64.iso \ --disk path=/home/kb310/test/ubuntu.qcow2,format=qcow2 \ --network network=br0,model=virtio \ --graphics vnc,listen=0.0.0.0, --noautoconsole \ --os-type=linux
但是以上方法每次都是重新安装系统,太麻烦。
下面介绍从虚拟机磁盘文件创建虚拟机的命令 ,但是这和 virt-instal 工具的版本有关系(可能和KVM的版本也有关系),不同版本的选项略微有差别,使用如下命令查看版本:
1
2
3
4
5
6
7
8
$ virt-install --version 1.3.2 或 0.600.4 (我只接触过这两个版本) $ kvm -version QEMU emulator version 2.5.0 (Debian 1:2.5+dfsg-5ubuntu10.30), Copyright (c) 2003-2008 Fabrice Bellard 或 # kvm -version QEMU emulator version 2.0.0 (Debian 2.0.0+dfsg-2ubuntu1.33), Copyright (c) 2003-2008 Fabrice Bellard
一种兼容前后版本的命令如下:
1
2
3
4
5
6
virt-install --virt-type kvm --name ubuntu --ram 4096 --vcpus=4 \ --import \ --disk path=/home/kb310/test/ubuntu.qcow2,format=qcow2 \ --network bridge=br0,model=virtio \ --graphics vnc,listen=0.0.0.0 --noautoconsole \ --os-type=linux
只适用于新版本的命令如下:
1
2
3
4
5
6
virt-install --virt-type kvm --name docker-$1 --ram 4096 --vcpus=4 \ --cdrom=/home/kb310/test/ubuntu.qcow2 \ --disk path=/home/kb310/test/ubuntu.qcow2,format=qcow2 \ --network bridge=br0,model=virtio \ --graphics vnc,listen=0.0.0.0 --noautoconsole \ --os-type=linux
主要的区别就在于 –import 选项是兼容的,而使用 –cdrom 只适用于新版本。
图形界面实现: 对于图形界面就是通过 virt-manager 来实现,但是这种方法貌似只适用于较新版本KVM环境,步骤如下:
打开 virtual machine mananger,-> 点击右上角新建虚拟机
选择 Import existing disk image,-> Forward
点击 Browse
点击 Browse Local,找到虚拟机磁盘镜像文件,->Choose Volume
点击 Forward
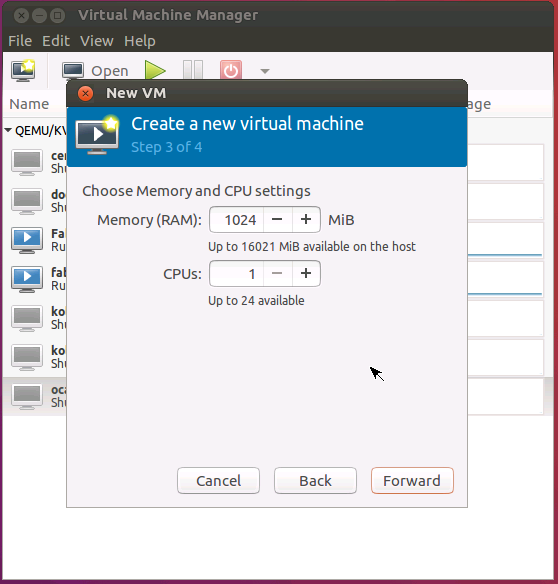
配置合适的内存和 CPU 个数,-> Forward
给虚拟机命名(但注意这不是虚拟机里面的 hostname),-> Finish
最后就会进入虚拟机的系统启动过程
遇到的问题 由于教研室有一些服务器的使用年限较长,有一些服务器的系统和软件版本较低,在使用 KVM 时碰到一些很烦人的问题,所以才写下这篇博客记录一下。如果在旧版本的环境下使用新环境才支持的命令选项,就可能会出现一些问题,如:
1
2
3
4
5
6
7
8
9
10
11
12
13
14
$ virt-install --virt-type kvm --name docker-$1 --ram 4096 --vcpus=4 \ --cdrom=/home/kb310/test/ubuntu.qcow2 \ --disk path=/home/kb310/test/ubuntu.qcow2,format=qcow2 \ --network bridge=br0,model=virtio \ --graphics vnc,listen=0.0.0.0 --noautoconsole \ --os-type=linux Starting install... ERROR internal error: process exited while connecting to monitor: qemu-system-x86_64: -drive file=/home/kb310/test/ubuntu.qcow2,if=none,id=drive-ide0-0-0,format=qcow2: could not open disk image /home/kb310/test/ubuntu.qcow2: Could not open '/home/kb310/test/ubuntu.qcow2': Permission denied Domain installation does not appear to have been successful. If it was, you can restart your domain by running: virsh --connect qemu:///system start hgh otherwise, please restart your installation.
上面出现的错误就是由于软件版本的不同导致的,所以最好使用兼容的命令选项。